What if the S$4,500 you invested in premium flooring is completely wasted because of a single hidden mistake? Most homeowners spend weeks picking the perfect wood-grain pattern, but the real secret to a “hollow-free” floor lies in the foundation. You likely want a home that feels solid underfoot and meets all HDB technical requirements without the stress of popping tiles or future repairs. It’s natural to feel anxious about moisture getting trapped under your vinyl in Singapore’s 84% average humidity, especially when a poor installation can void your 10-year material warranty.
We believe quality is the #1 priority for every homeowner. Learning how to prepare subfloor for vinyl tiles is the most critical step to ensure a professional, long-lasting result that stays beautiful for decades. This guide provides you with the knowledge to master the preparation process and verify your contractor’s work with confidence. We will cover everything from floor leveling compounds to moisture barriers to ensure your renovation is entirely risk free.
Key Takeaways
- Learn why a flat, stable foundation is the secret to a flawless finish and how to avoid the “telegraphing” effect that can ruin your floor’s aesthetics.
- Master the professional 5-step process on how to prepare subfloor for vinyl tiles to ensure your new flooring remains durable and beautiful for years.
- Evaluate whether to overlay or hack existing tiles by understanding the critical trade-offs between cost-effectiveness and floor height.
- Protect your investment by avoiding common local pitfalls, such as ignoring mandatory 48-hour acclimatisation and expansion gaps required for Singapore’s tropical heat.
- Discover the “Risk Free” advantage of professional site assessments and the use of eco-friendly, Green Label Singapore certified materials for a safer home.
Why Subfloor Preparation is the Secret to Flawless Vinyl Flooring
Most homeowners focus on the color or pattern of their new vinyl. That’s a mistake. The real magic happens underneath. A subfloor must be three things: flat, dry, and stable. Without these, even the most expensive luxury vinyl tiles will fail within months. At Home Expo Asia, we’ve completed over 10,000 installations across Singapore. We know that a “Risk-Free” foundation isn’t just a marketing slogan; it’s a technical requirement for a floor that lasts. Quality is our #1 priority, and that starts before the first tile is ever laid.
Vinyl is a flexible material. If there’s a tiny 2mm pebble or a ridge in the cement, it will eventually show through the surface. This is known as the “telegraphing” effect. Understanding the requirements for your Vinyl Flooring Subfloor is vital because any imperfection below becomes a visible eyesore above. Learning how to prepare subfloor for vinyl tiles correctly ensures your floor looks like a seamless surface rather than a bumpy map of the concrete underneath. It’s about more than just looks. Proper prep prevents joint separation. When a subfloor is uneven, the click-lock systems or adhesive bonds are under constant stress. This leads to gaps that collect dirt and moisture, eventually ruining the structural integrity of the planks.
The Consequences of Poor Preparation
Skipping the prep stage leads to expensive repairs. We often see “hollow” spots in HDB units where the vinyl wasn’t leveled. Walking on these feels spongy and eventually causes the vinyl to crack under pressure. Moisture is another silent killer. If water is trapped in the subfloor, it leads to mould and foul odours that permeate your home. Most importantly, poor prep voids your protection. Our 10-year material warranty and 1-year installation warranty require the subfloor to be leveled to within a 3mm tolerance over a 2-meter radius. If you don’t meet these standards, you lose your “Risk-Free” coverage.
- ✓ Prevents “hollow” sounds when walking
- ✓ Stops mould growth in high-humidity areas
- ✓ Ensures your 10-year warranty remains valid
- ✓ Protects the integrity of click-lock joints
Singapore-Specific Challenges
Singapore presents unique environmental hurdles for flooring. Our local humidity levels often hit 80% or higher. This moisture can seep into cement screed and cause adhesive failure if not addressed. In HDB and Condo units, we typically deal with three subfloor types: cement screed, existing ceramic tiles, or old timber. Each requires a specific protocol. For example, existing tiles must be checked for “popping” or cracks before we apply a self-leveling compound. We use our 50 years of combined experience to assess these local conditions, ensuring every job is certified and safe for your family. We don’t cut corners because we provide an official invoice and stand by our work.
To get the best results, you must understand how to prepare subfloor for vinyl tiles in a tropical climate. It’s not just about cleaning the surface; it’s about moisture testing and ensuring a pH-neutral base. Our team uses professional-grade equipment to measure these variables. This methodical approach is why we maintain a 5.0/5.0 rating on Google. We treat your home with the respect it deserves, providing prompt and efficient customer support from the initial site survey to the final walkthrough. When the foundation is right, your vinyl flooring becomes a durable, water-resistant, and beautiful asset for your home.
5 Essential Steps to Prepare Your Subfloor for Vinyl Tiles
A flawless vinyl floor starts long before the first plank is laid. If the foundation is weak, your investment will fail. At Home Expo Asia, we’ve seen how skipping basic prep leads to “telegraphing,” where every bump in the concrete shows through your beautiful new floor. Follow these five steps to ensure your installation remains durable and professional.
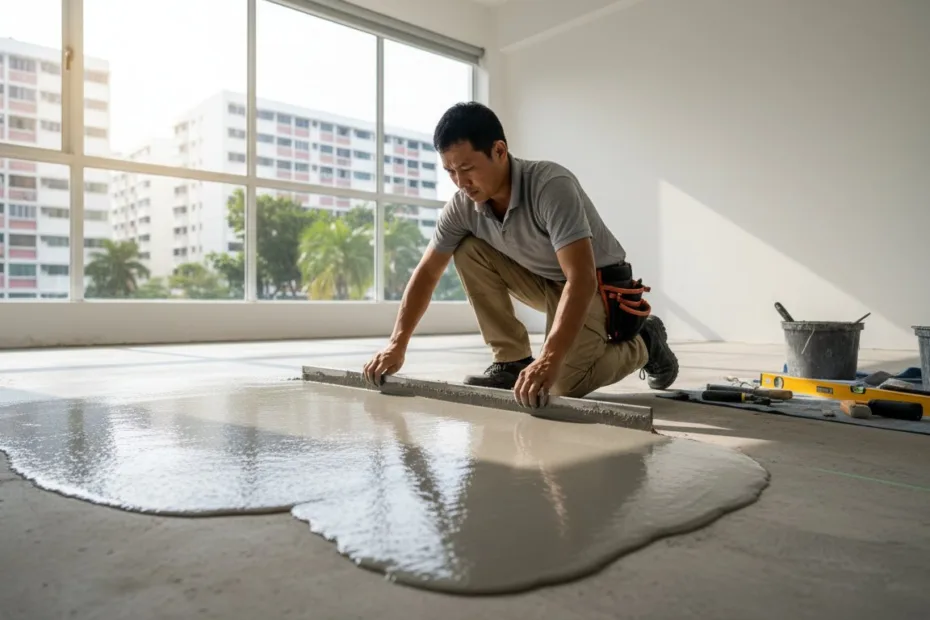
- Step 1: Clear and Deep Clean. Remove all existing floor coverings, old adhesive, and paint spills. Use a heavy-duty vacuum to remove every grain of dust. Even a tiny pebble can cause a puncture in luxury vinyl tiles over time.
- Step 2: Levelness Testing. Use a 2-metre straightedge to identify gaps or peaks. You’re looking for deviations no larger than 3mm.
- Step 3: Moisture Testing. Ensure your concrete screed is dry. Levels must be below 2.5% CM (Calcium Carbide Method) before you proceed.
- Step 4: Patching and Filling. Use a high-quality cementitious patching compound to fill grout lines if you’re installing over existing ceramic tiles. This prevents the “grid” pattern from appearing on your vinyl surface.
- Step 5: Final Sanding and Priming. Lightly sand the patched areas. Apply a floor primer to seal the surface, which ensures the adhesive forms a maximum bond with the subfloor.
Testing for Levelness and Flatness
Precision is the hallmark of a professional installer. When learning how to prepare subfloor for vinyl tiles, you must adhere to the “3mm over 2 metres” rule. Place a 2-metre straightedge across various sections of your room. If you can slide a S$2 coin under the straightedge, the floor is too uneven. High spots require grinding down with a concrete sander, while significant depressions need a self-levelling compound. If your structural floor is particularly uneven, you might consider an Underlayment for Resilient Flooring to create a perfectly flat plane for the tiles.
Moisture and Humidity Control
Singapore’s high humidity poses a unique challenge for flooring. New cement screed, common in BTO flats, requires a minimum 60-day curing period. Rushing this process traps moisture, which eventually causes the vinyl adhesive to fail or mould to grow. We always use a calcium carbide (CM) moisture meter for 100% accuracy, as electronic “pin” meters often give false readings in our tropical climate. If your readings stay above 2.5% CM, you must install a liquid epoxy moisture barrier. This S$5 to S$8 per square foot investment prevents thousands of dollars in future water damage. It’s a key reason why many homeowners choose the professional reliability offered by Home Expo Asia for their installations.
Once the floor is dry and level, the final step involves a thorough sweep and the application of a primer. In Singapore, acrylic-based primers are preferred because they handle the heat and humidity without becoming brittle. A well-primed floor ensures the vinyl tiles won’t shift or lift at the edges, even in high-traffic areas like the kitchen or living room. Taking these steps seriously means your floor will look as good in ten years as it does on the day of installation.
Overlaying vs. Hacking: Choosing the Right Base for Vinyl
Choosing between overlaying and hacking is the most critical decision in your renovation journey. This choice impacts your budget, timeline, and the final height of your flooring. If your existing ceramic or homogeneous tiles are structurally sound, overlaying is a brilliant, cost-effective option. It typically saves homeowners between S$2,000 and S$5,000 depending on the floor area, as it eliminates the need for expensive demolition and haulage fees. However, overlaying adds approximately 5mm to 8mm of height to your floor. This might require you to trim the bottom of your doors to ensure they swing freely.
Hacking becomes mandatory when existing tiles show signs of “popping” or are visibly loose. In Singapore’s humid climate, thermal expansion often causes older tiles to buckle or detach from the mortar bed. Installing vinyl over unstable tiles is a recipe for failure; the movement will eventually cause the vinyl joints to snap. When you decide to hack, you must follow strict HDB regulations. You are required to obtain a HDB Renovation Permit before work begins. Additionally, hacking is generally not allowed in bathrooms for the first three years after a flat’s TOP to protect the original waterproofing membrane.
Our team of experts always recommends a thorough site assessment to determine how to prepare subfloor for vinyl tiles effectively. We look for:
- ✓ Structural cracks that indicate subfloor movement
- ✓ Significant height variances across the room
- ✓ Signs of moisture or efflorescence in grout lines
- ✓ Adhesion strength of the existing tile glaze
Preparing Existing Tiles for Overlay
If your tiles pass the initial inspection, we move to the “Tap Test.” We use a specialized tapping rod to check every tile for hollow sounds. Any tile that rings hollow must be removed and patched before the vinyl goes down. Next, we focus on deglossing. Most ceramic tiles have a slick, non-porous glaze that prevents adhesives from sticking. We use professional-grade etching chemicals or mechanical sanding to create a “key” for the new material. Finally, we fill every grout line with a high-strength leveling compound. This step is vital to prevent “ghosting,” where the grid pattern of the old tiles telegraphs through to the surface of your new vinyl over time.
The Role of Cement Screed
Cement screed is the gold standard for creating a perfectly level base. It’s a precise mixture of cement and sand that eliminates the dips and peaks found in raw concrete. For Luxury Vinyl Tiles (LVT), a smooth finish isn’t just a preference; it’s a requirement. If the floor deviates by more than 3mm over a 2-meter span, the click-lock mechanisms on your vinyl planks will eventually fail under foot traffic. Professional screeding ensures a flat surface that supports the integrity of your floor for decades. You can find more details on this process in our article Cement Screed: The Perfect Base for Flawless Floors. This step is the best way to ensure your renovation stays “Risk Free” and looks professional. When considering how to prepare subfloor for vinyl tiles, never underestimate the power of a high-quality screed layer.
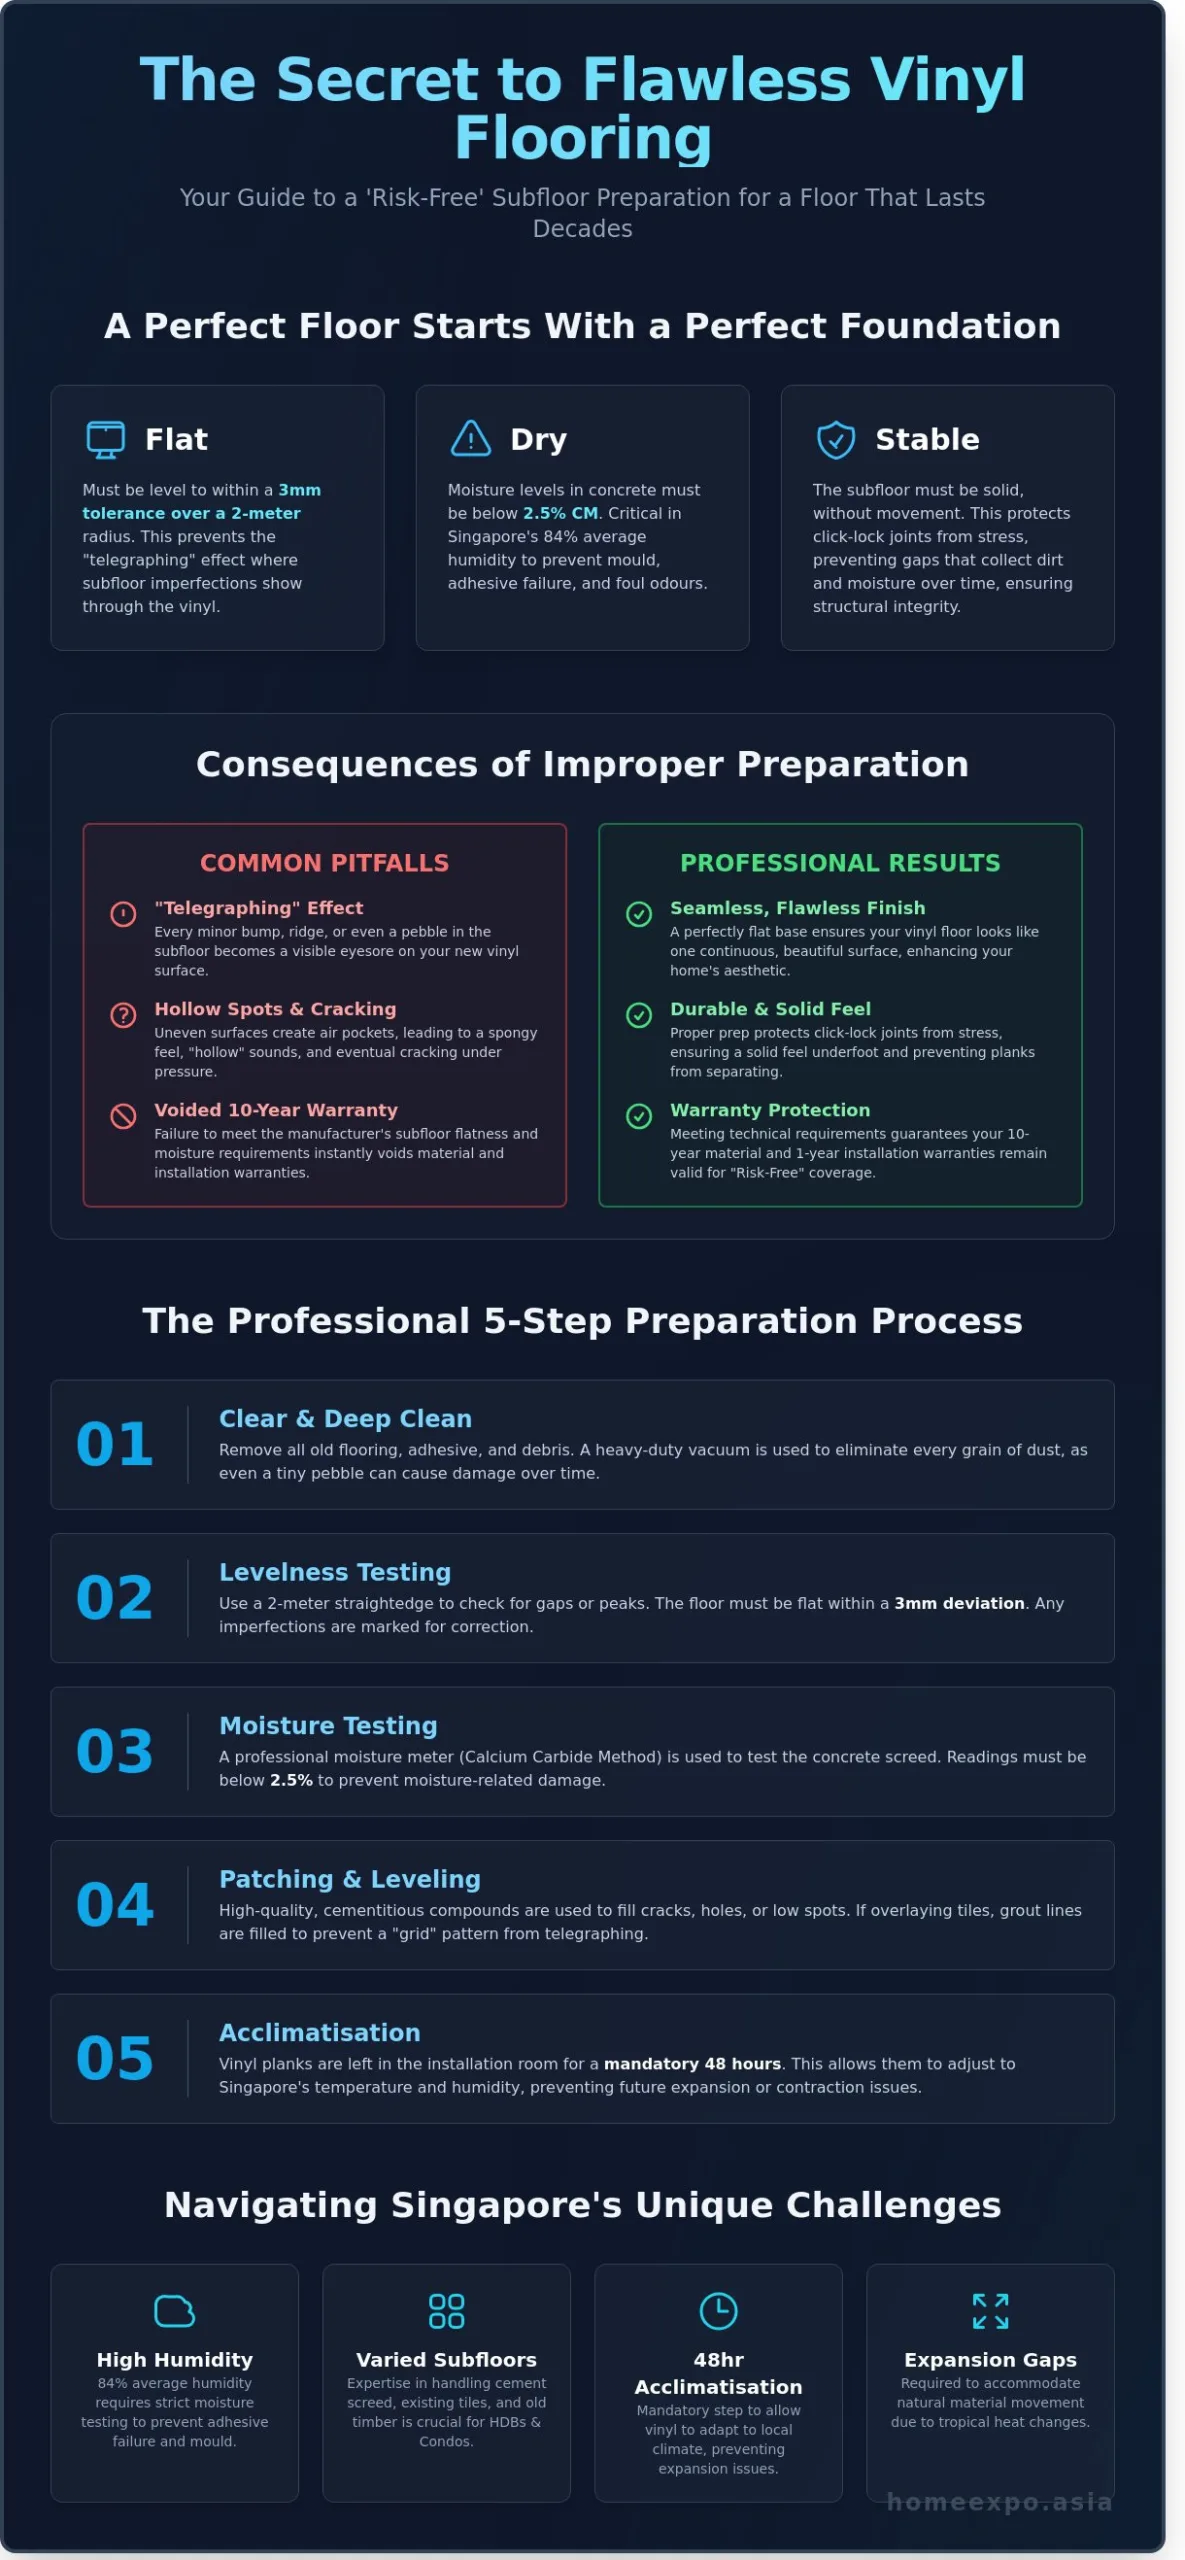
Common Subfloor Pitfalls to Avoid in Singapore
Singapore’s tropical climate presents unique challenges that can ruin a flooring project if you aren’t careful. High humidity levels, which often average 84% year-round, directly impact how materials behave. If you want to know how to prepare subfloor for vinyl tiles properly, you must account for moisture and heat from the start. Skipping these steps leads to buckling, popping joints, or even mold growth under your new floor. We see these issues often when homeowners rush the process without professional guidance.
The Acclimatisation Rule
Vinyl tiles are sensitive to temperature shifts. In Singapore, the jump from a hot delivery truck to an air-conditioned HDB flat is significant. You must let your vinyl boxes sit in the installation room for at least 48 hours. This allows the material to expand or contract to the room’s specific environment. Stack the boxes flat on the floor, never upright. Keep the stacks no more than five boxes high to prevent the bottom tiles from warping under pressure. This simple 2-day wait ensures the tiles stay stable after they’re locked into place.
- ✓ Always store boxes in the center of the room, away from direct sunlight.
- ✓ Keep the room temperature consistent during the 48-hour period.
- ✓ Don’t open the boxes until you’re ready to start the actual installation.
Expansion Gaps and Skirting
Vinyl is a “floating” floor, meaning it needs room to breathe. You must leave a 5mm to 8mm gap between the edge of the vinyl and every wall or fixed object. Without this gap, the floor will hit the wall when it expands in the afternoon heat, causing the center of the room to “bubble” or “tent.” We use professional skirting boards and L-profiles to hide these gaps. These finishing touches ensure your floor looks seamless while still allowing the necessary 8mm of movement. It’s a small technical detail that prevents a total floor failure.
Another frequent mistake is using the wrong underlayment. Many modern SPC vinyl tiles come with a pre-attached IXPE foam backing. If your tiles already have this, adding another layer of thick foam is a bad idea. Too much cushioning makes the floor “bouncy.” This extra movement puts immense stress on the click-lock joints, eventually causing them to snap. Stick to a high-density, thin underlayment if one is required, or follow the manufacturer’s specific guidelines for your subfloor type.
Rushing onto “green” concrete is the final pitfall to watch for in new BTO units. Freshly poured concrete slabs take time to cure. You should wait at least 28 days for a new slab to dry before testing moisture levels. If the moisture content is above 3.5%, the trapped water will eventually cause the vinyl to de-bond or create a breeding ground for bacteria. We always recommend a moisture test to ensure your subfloor is bone-dry before the first tile is laid.
At Home Expo Asia, we believe in doing things right the first time. Our team brings more than 50 years of combined experience to every home, ensuring your installation is handled with professional care. It’s Risk Free! We provide a 1-year installation warranty and a 10-year materials warranty for your peace of mind.
Professional Installation: The Home Expo Asia Advantage
While understanding how to prepare subfloor for vinyl tiles is essential for any homeowner, the actual execution requires a level of precision that only comes with decades of practice. A DIY estimate often relies on the naked eye, but professional site assessments use moisture meters and laser levels to detect issues you might miss. We’ve seen countless projects where a 2mm deviation caused floor boards to click or gap within six months. Home Expo Asia brings over 50 years of combined experience in Singaporean renovations to ensure your foundation is flawless from the start. We don’t just install floors; we engineer a stable environment for your home.
Our commitment to quality is why we call our service “Risk-Free.” We provide a comprehensive 1-year installation warranty alongside a 10-year material coverage. This double layer of protection ensures that if any issues arise from the way we handled your subfloor or the tiles themselves, you’re fully covered. In the local market, where humidity levels often exceed 80%, having this professional oversight is the only way to guarantee your floor won’t warp or lift. We take the stress out of the process by handling the heavy lifting and the technical calibration.
- ✓ Over 50 years of combined renovation expertise in Singapore
- ✓ Precision tools for moisture and level testing
- ✓ 1-year installation warranty for peace of mind
- ✓ 10-year material warranty against defects
- ✓ S$0 hidden fees on all official quotes
Certified Quality and Safety
Safety is our #1 priority. We only use materials that meet the strictest international standards for indoor air quality. Our vinyl products carry the Green Label Singapore certification, ensuring they’re eco-friendly and safe for your family. We also prioritize FloorScore and SGS certifications, which prove our floors have low VOC emissions. When you choose us as Your Trusted Vinyl Flooring Supplier in Singapore, you’re investing in a home environment that’s healthy and sustainable. Mastering how to prepare subfloor for vinyl tiles is only half the battle; using non-toxic, certified materials is what makes a renovation truly successful.
Book Your Free Site Assessment
Don’t leave your flooring to chance. During a Home Expo Asia site visit, our technicians perform a deep-dive analysis of your current subfloor. We check for structural integrity, rising dampness, and surface irregularities that could compromise your new vinyl. After the assessment, you’ll receive an official invoice with a clear breakdown of costs. We maintain a strict “No Hidden Fee” policy, so the price you see is the price you pay. Our 5.0/5.0 Google reviews reflect our dedication to transparent, high-quality service across thousands of Singaporean households. Book your free site assessment today and let our experts handle the technical details while you focus on choosing the perfect design for your space.
We’ve completed over 10,000 jobs across the island, from HDB flats to commercial showrooms. Our team understands the specific challenges of Singapore’s climate and construction styles. We don’t skip steps, and we don’t cut corners. Every site visit is an opportunity for us to prove why we’re the top-rated installers in the region. You’ll get professional advice tailored specifically to your home’s layout and your family’s needs.
Start Your Flawless Flooring Transformation Today
A beautiful home begins with a solid foundation. You now understand that moisture testing, leveling, and choosing between hacking or overlaying are the critical pillars of a successful renovation. Learning how to prepare subfloor for vinyl tiles is the best way to protect your investment and ensure your new floor doesn’t warp or peel within months. Our team at Home Expo Asia simplifies this technical process by handling every detail with professional precision.
We believe quality is the top priority for every Singaporean homeowner. We provide an Official Invoice for every project, ensuring there are No Hidden Fees at the end of the day. Our commitment to excellence is backed by several key facts:
✓ 5.0/5.0 Google Reviews from hundreds of happy customers;
✓ Green Label Singapore Certified products that are safe and eco-friendly;
✓ Over 50 years of combined industry experience.
Don’t leave your home’s safety to chance. It’s risk-free to get started with an expert team that values your peace of mind as much as you do. Get a Risk-Free Vinyl Flooring Quote Today and take the first step toward a stunning, durable floor you’ll love for years.
Frequently Asked Questions
Can I install vinyl tiles directly over my existing HDB floor tiles?
Yes, you can install vinyl tiles over existing HDB ceramics if they are level and structurally sound. This method saves you roughly S$500 to S$1,500 in hacking and disposal fees. Our team ensures the surface is clean and grout lines are filled to prevent “telegraphing” where the tile pattern shows through the vinyl. It is a fast, dust-free way to refresh your home while maintaining a high standard of quality.
How long does it take for a new cement screed to dry before vinyl installation?
A new cement screed typically takes 7 to 14 days to dry enough for vinyl installation. However, a full cure often requires 28 days depending on the thickness and ventilation in your Singapore flat. We use professional moisture meters to confirm the level is below 5% before we start work. This patience prevents adhesive failure and ensures your floor remains “Risk Free” for years to come.
What is the maximum allowable unevenness for a vinyl subfloor?
The maximum allowable unevenness for a vinyl subfloor is 3mm over a 2-meter radius. If the floor exceeds this limit, the click-lock joints may snap or separate under daily foot traffic. Learning how to prepare subfloor for vinyl tiles involves using a straightedge to identify these specific high or low spots. We then use self-leveling compounds to achieve a perfectly flat surface for a professional and durable finish.
Do I need an underlayment if I am installing vinyl tiles?
Yes, you usually need a 1mm to 2mm IXPE or EVA underlayment for vinyl tiles. Many of our premium vinyl products come with a pre-attached underlayment to simplify the installation process. This layer provides essential sound insulation, reducing noise by up to 20 decibels. It also adds a slight cushion, making the floor more comfortable for your family to walk on every day in your home.
How do I know if my subfloor has a moisture problem?
You can identify moisture problems by looking for dark damp patches or white powdery “efflorescence” on the concrete surface. In Singapore’s 80% average humidity, we recommend a plastic sheet test or a digital moisture meter reading. If moisture levels exceed 5%, you must apply a moisture barrier. This step is vital to prevent mold growth and ensure your 10-year material warranty remains valid and protected.
What should I do if my existing tiles are popping or hollow?
You must remove any popping or hollow tiles before laying vinyl to ensure a stable base. Hollow sounds indicate the tile has debonded from the screed, which creates an unstable foundation for your new floor. We hack away the loose pieces and fill the gap with a quick-setting patch compound. This ensures a solid foundation and prevents the vinyl from shifting or making clicking noises when you walk on it.
Is it necessary to remove old adhesive from the subfloor before installing new vinyl?
Yes, you must remove at least 95% of old adhesive residue to ensure a flat and clean surface. Old glue can react chemically with new adhesives or create unsightly bumps under your thin vinyl planks. Understanding how to prepare subfloor for vinyl tiles correctly means scraping the floor clean or using a floor grinder. A clean subfloor is the only way to guarantee a professional, long-lasting bond for your investment.
How much does professional subfloor preparation cost in Singapore?
Professional subfloor preparation in Singapore typically costs between S$2.00 and S$5.00 per square foot. This price varies based on whether you need minor patching or a full 3mm self-leveling treatment. At Home Expo Asia, we provide an official invoice with no hidden fees. Investing in proper prep now saves you from expensive repairs or floor replacements 4 or 5 years down the road.