Due to its ease of installation, affordability, and durability, vinyl flooring has become popular among homeowners in recent years. With technological advancements, vinyl flooring has come a long way in appearance and quality, making it an attractive choice for those who want to update their flooring without breaking the bank.

Unlike traditional hardwood or tile flooring, vinyl planks or tiles can be installed DIY (Do it yourself). Many vinyl flooring options are designed with a click-and-lock system, which allows the planks or tiles to snap together easily. Homeowners can save money by installing the flooring and avoid professional installation costs.
Another benefit of vinyl flooring is its affordability. Vinyl flooring is typically less expensive than hardwood or tile flooring, making it an excellent option for those on a budget. Additionally, vinyl flooring can last for many years, meaning homeowners won’t have to replace it as frequently as other types of flooring.
In addition to being affordable and easy to install, vinyl flooring is incredibly durable. Vinyl planks or tiles are scratch and stain-resistant, making them an ideal option for high-traffic areas or homes with children and pets. Many vinyl flooring options also come with a protective layer that helps to prevent moisture damage, making them an excellent choice for bathrooms, kitchens, and basements.
Materials
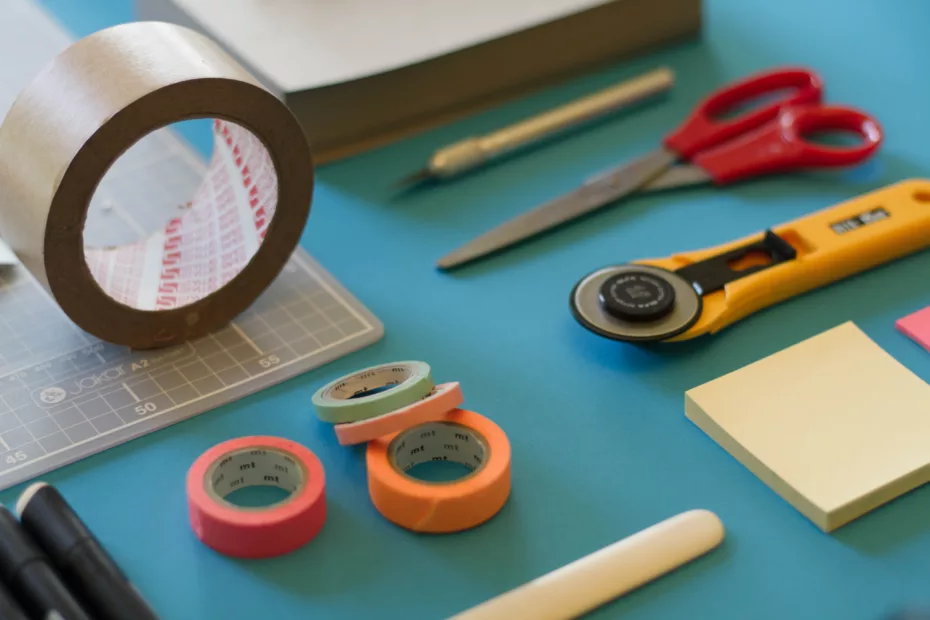
| Material | Tools |
| Vinyl flooring planks or tiles | Tape Measure |
| Underlayment (optional) | Utility knife or vinyl cutter |
| Adhesive (if required) | Straight edge or T-square |
| Transition strips | Chalk line |
| Pencil or marker | |
| Floor roller or rubber mallet | |
| Safety glasses | |
| Dust maks | |
| Pry bar (for removing baseboards) |
Note that some vinyl flooring options have adhesive or click-and-lock installation systems, eliminating the need for separate glue or transition strips.
Check the manufacturer’s instructions to determine the materials and tools needed for your specific vinyl flooring installation.
You might like: 10 Reasons Why Vinyl Flooring Is a Great Choice For Your Home
Preparation
Proper preparation of the subfloor is crucial for a successful vinyl flooring installation. The subfloor must be clean, level, and free of debris or imperfections that may affect the flooring’s durability or appearance. Here are the steps to prepare the subfloor for vinyl flooring installation:
- Remove any existing flooring: If there is existing flooring in the room, it should be removed; this includes any carpet, padding, or adhesive residue. Use a pry bar or scraper to remove any baseboards or trim around the room’s edges.
- Clean the subfloor: The subfloor must be clean and free of debris. Sweep or vacuum the floor thoroughly, then use a damp mop to remove any remaining dirt or dust. Allow the subfloor to dry completely before proceeding.
- Check for levelness: Use a level or straight edge to check the subfloor’s levelness. Use a floor patching compound to level the floor if there are any high or low spots. Allow the compound to dry completely before proceeding.
- Install an underlayment (optional): If you use an underlayment, such as foam or cork, install it over the subfloor according to the manufacturer’s instructions.
- Mark the centerline: Use a chalk line to mark the room’s centerline; this will help lay the vinyl planks or tiles straight.
- Acclimate the vinyl flooring: Allow the vinyl flooring to acclimate in the room for at least 48 hours before installation; this allows the flooring to adjust to the room’s temperature and humidity, ensuring a more stable structure.
By adequately preparing the subfloor, you can ensure a successful vinyl flooring installation that will look great and last many years.
Measuring and cutting
Measuring and cutting vinyl flooring is an essential part of the installation process. Here are the steps to measure and cut vinyl flooring to fit the room:
- Measure the room: Measure the length and width of the room, and multiply these numbers to get the total square footage of the room. Add 10% to this number to account for any waste or mistakes.
- Plan the layout: Use the centerline you marked earlier for the vinyl flooring layout; this will help you determine how many full planks or tiles you will need and how many partial planks or tiles you will need to cut.
- Cut the planks or tiles: Use a straight edge or T-square to mark the vinyl plank or tile where it needs to be cut. Use a utility knife or vinyl cutter to cut the plank or tile along the drawn line. Be sure to cut the vinyl plank or tile from the back to the front to avoid chipping or cracking.
- Install the planks or tiles: Begin installation at the main entrance or a straight wall, laying the full planks or tiles first. Use a floor roller or rubber mallet to ensure a tight fit between the planks or tiles. For partial planks or tiles, measure and cut them to fit using the steps above.
- Trim the edges: Use a straight edge and utility knife to trim the edges of the vinyl flooring to fit around the room’s perimeter. Install any transition strips or baseboards to finish the installation.
By following these steps to measure and cut the vinyl flooring, you can ensure a professional-looking installation that fits perfectly in your room.
Installation
Here are step-by-step instructions for installing vinyl flooring:
- Prepare the subfloor: Follow the instructions outlined earlier to prepare the subfloor for vinyl flooring installation.
- Acclimate the vinyl flooring: Allow the vinyl flooring to acclimate in the room for at least 48 hours before installation; this allows the flooring to adjust to the room’s temperature and humidity, ensuring a more stable structure.
- Begin installation at the centerline: Starting at the room’s main entrance or a straight wall, lay the full vinyl planks or tiles in a straight line. Use a floor roller or rubber mallet to ensure a tight fit between the planks or tiles.
- Install subsequent rows: Continue laying full planks or tiles in rows until you reach the room’s edges. Be sure to stagger the joints between rows to create a more natural-looking floor.
- Cut partial planks or tiles: Measure and cut any partial planks or tiles needed to fit around the room’s edges. Use a straight edge or T-square to ensure accurate cuts.
- Install trim: Install any transition strips or baseboards around the room’s edges to finish the installation.
- Clean up: Once the vinyl flooring is installed, clean up any debris or dust left behind from the installation process.
Following these simple steps, you can install vinyl flooring in your home.

You may also like: 5 Easy Steps to Keep Your Vinyl Floor Squeaky Clean
Things you should consider before installing vinyl flooring by yourself
While DIY vinyl flooring installation can be a cost-effective option, it’s essential to consider the amount of effort and skill required to complete the task successfully. This type of installation can be physically demanding and time-consuming, and even tiny mistakes can lead to significant issues down the line, such as uneven or unstable floors.
Hiring a professional installer ensures that your vinyl flooring is installed correctly and efficiently, with minimal hassle and stress. A professional installer will have the knowledge, skills, and tools needed to tackle any challenges that may arise during the installation process, ensuring a high-quality result that will stand the test of time.
Professional installation saves time and effort and ensures you get the most out of your vinyl flooring investment. With a professional installation, you can rest assured that your floors are built to last and will provide a beautiful, functional surface for years to come. Home Expo Asia can be your best choice to help you install your vinyl flooring
So, while DIY installation may seem attractive, it’s essential to weigh the benefits of professional installation. Working with a professional installer lets you enjoy peace of mind knowing that your vinyl flooring is installed by an expert, leaving you free to sit back and enjoy your beautiful new floors without having to touch up the floor and adjust it every few months.
Conclusion
It is highly recommended that readers avoid attempting DIY vinyl flooring installation and instead hire professional installers. Installing vinyl flooring is physically demanding and time-consuming, and mistakes during the installation process can lead to significant issues down the line.
Professional installers have the expertise, knowledge, and tools to complete the installation efficiently and effectively, ensuring a high-quality result that will last many years. By investing in professional installation, you can save time, effort, and stress and enjoy peace of mind knowing that your floors are built to last.